My daughter will go to art school in the fall and I am both extremely proud and extremely jealous. She will be living her art dream, while I will remain a closet artist who refers to myself as a crafter and keeps my skills in the hobby realm.
I’m actually okay with it. I’m happy that she found her passion young, and I like to think my genetics helped even if only in a small way. Certainly having a craft room and access to endless craft supplies had to have fed her artistic talents at some point along the way.
My creative outlet may be different than her path, but my love of art classes is intense and if it’s a class on something I have never tried before I am even more intrigued. When I saw that Artascope Studios was offering a Saltwater Etching for Copper class as one of their Sunday One-Day Workshops, I couldn’t sign up fast enough. I mean that literally. I think I was the first person who registered for the class.
I’ve taken classes at Artascope Studios before and even blogged about some of my previous jewelry creations during my A to Z Challenge Post – J is for Jewelry Making at Artascope Studios. They have amazing, creative classes covering a range of mediums and techniques. All of my previous visits had been to their location at 352 Cottage Rd, South Portland, ME. This was my first visit to their latest workshop space at the Bickford Education Center, 48 Railroad Square, Yarmouth, ME. Both spaces are beautiful, character rich locations.
The space at the Bickford Education Center was especially wonderful with plenty of room to spread out and work. There was a wall of windows along one side of the main workshop area which provided great natural light. It was a perfect spot to create some art.
Our instructor was well versed in this medium, having done it for a number of years, and she had great tips and tricks on how to make etchings.
It was also helpful that I approached the class with few expectations other than learning a new skill which made it a great opportunity to take risks. I was not focused on the end product. It didn’t matter to me how my pieces came out. Probably because of this approach, I ended up loving everything that I made in the class. Sometimes not trying to hard has its rewards.
Below are the steps that I used during the class to create my pieces. This is my no means a comprehensive list of instructions but more a loose overview of the process. I highly recommend taking a class at Artascope Studios if you are interested in learning this technique.
Step 1)
I started by purchasing a class kit which had copper and brass pieces in varying sizes and shapes that we would be making our etchings on during the workshop. The first step was to clean the pieces and remove any fingerprints, residue or other contaminants that might interfere with the etching process. I used a toothbrush along with some mild copper cleanser to give the pieces a quick cleaning.
Step 2)
Once the pieces were clean, it was time to start creating the designs. Anything marked in ink would resist the etching process and become the raised part of the design. I quickly learned that you are able to use a range of techniques to create your design including rubber stamps, sharpie markers, dry ink toner, and nail polish to name a few. You can use tape as well to mark off areas or create patterns and designs although I didn’t attempt that method during this class. I did try the rest of the different techniques to see how each option would impact the end result.
Our instructor had printed out some designs using toner ink printed onto glossy magazine paper. My Japanese woman in the picture below right was created by ironing the toner picture onto the copper and then removing the paper by cooling it in a bowl of water and rubbing off the paper leaving only the ink behind. When ironing a picture, it’s helpful to use a blank piece of paper between the picture and the iron as a buffer to help protect the metal.
Step 3)
After creating the design, it was time to place the pieces into the etching material and see the magic happen. For this step, there were a couple of choices available.
Solution a)
The first option was a salt water bath, using a battery operated current. The salt water can be made using a variety of salt types including rock salt with the important criteria being to super saturate the water with salt. It might take a day or so to get the salt water saturated enough to where it can no longer dissolve any more salt although heating the water during this process can help to expedite the process.
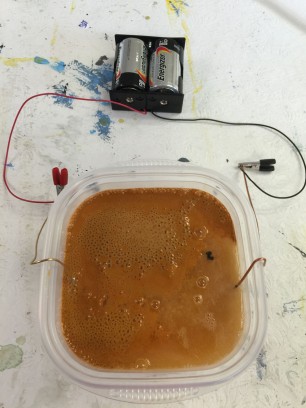
Once the salt water is ready, you will need copper wire and an extra copper piece to be used as the cathode. The important thing is that whatever you use as the cathode should be bigger than the piece that is being etched. I cut a piece of wire and then attached it using packaging tape to the back of the piece to be etched. This became my anode and was clipped with a clamp to the red wire coming off the battery. My cathode, or blank piece of copper, was then attached to another piece of wire and submerged in the water. The wire from this piece is then attached to the black wire using another clamp.
As soon I attached the wires and completed the circuit, the water began to bubble and fizz telling me that the etching process had started. With this technique the cathode cooper piece absorbs the copper flecks from the other piece as the etching process moves forward. The clear salt water became orange and murky quickly. We left the pieces in the bath for about 30 minutes at which point we tested the etching by rubbing our gloved fingers over the piece to be sure they were etched sufficiently. Once we were happy with the etching, we took the pieces out of the bath.
Solution b)
The second etching technique uses a solution of ferric chloride in which you lay the pieces into the solution face down. To place them face down in the solution, we used packing tape long enough to span the width of the plastic container. We placed the tape on the back of the pieces and then gently placed them on the surface of the chemical holding them in place on each end of the container with the tape.
Step 4)
After sitting in the etching solution for about 30-45 minutes, the pieces could be removed and neutralized. This is especially important if using ferric chloride for your etching. We placed the pieces into a baking soda bath to neutralize and then cleaned them with soap and water to remove any remaining residue.
Step 5)
The pieces we were working with had sharp pointed edges which while fine during the crafting process, would make for dangerous jewelry or other baubles. Using a nail file, I worked on the corners to round them off and give them a more finished look.
Step 6)
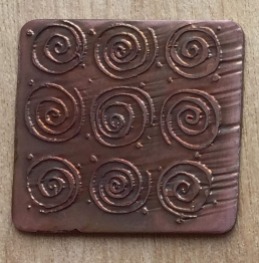
At this point the etching was completed, but a final step to age the piece and add depth and darker color is needed to get to the desired look shown below. This is super quick and completed by putting the pieces in a Liver of Sulfur hot bath for a few minutes The etched piece on the top left of the pictures below is before aging it in the Liver of Sulfur while the image directly below it is after aging the piece.
Step 5)
Since we were also making a bracelet from the longer, straight copper piece, now that it was etched, it was time to shape the piece. This was a slow, repetitive process of hammering the bracelet against the form, flipping it over and hammering again. You continue to repeat this process until the bracelet begins to harden into it’s new shape.
Step 6)
After shaping into a bracelet, we put the bracelet into the rock tumbler to smooth it out. I had aged my piece prior to the rock tumbler but felt that while smoothing out the bracelet was good it had brightened it back up again. No problem! I put the bracelet back into the Liver of Sulfur solution for another minute or two and voila my bracelet was done!
Sadly, I never got to wear my bracelet. My daughter borrowed it as soon as I got home, but at least I know it is well loved.
** Hazardous Waste ** While I love trying new crafts, I am always aware of the chemicals that I am using. With this craft, it is important to note that the salt water once used for etching becomes a hazardous waste and should not be poured down the drain. Please store and mark the container containing the solution properly and drop off during your towns hazardous waste pick-up.
This was another great class from Artascope Studios. While I don’t know that I will be etching things on a regular basis, it’s good to understand the process and certainly something I might revisit in the future. For now, I’m keeping my stash of etched metal pieces to be used as tags and do-dads on my scrapbooking pages and I might even be able to borrow my bracelet from my daughter from time to time.
| things to know | |
|---|---|
| Artascope Studios | 48 Railroad Square, Yarmouth, Maine |
| Phone | (207) 799-5154 or (207) 847-4060 |
| Class | Sunday One-Day Workshop |
| Website | Artascope Studios |
| Favorite ♥ | Creating Art |


What a fascinating process!
LikeLiked by 1 person
It really was interesting. I couldn’t believe that using something as easy as a sharpie marker was enough of a resist to create the etchings.
LikeLike
I’d never even heard of this technique, but the pieces that result are so cool!
LikeLiked by 1 person
I really did love the pieces that resulted from the etching process. It is a forgiving technique and even “mistakes” can lead to awesome end results.
LikeLiked by 1 person
That’s the kind of technique I like! Mistakes are OK!
LikeLiked by 1 person
Me too!
LikeLiked by 1 person