

Camps feel like a uniquely Maine thing. I know cottages, chalets, cabins and other getaway spots essentially amount to the same thing but in Maine we call them camps. As soon as you say camp, it brings up visions of a ramshackled home built in a slightly haphazard way over several generations. People used whatever materials they had on hand for upgrades and repairs so nothing really matches. It’s a mess but in a beautiful way.
That was what our home in Maine looked like when we first bought it. It was our camp on the lake. The smaller, original cottage had been added to over the years without any real sense of design or cohesiveness. What was once likely an outside porch along the lakeside of the house had been enclosed obscuring views of the lake from the main part of the home. The narrow, awkward stair case in the middle of the house didn’t help. The whole camp was covered in vinyl siding and a series of long forgotten satellite dishes dotted the roof.
The attached deck had a bench seat along the outer edge. While great in theory and convenient at times, it left a large gap underneath that clearly was not up to code. The first thing my father did after we moved into the house was add a wooden barrier along the bottom of the bench so his young granddaughters would not fall to their death.
It was a wreck but it was ours and it was on a lake. We didn’t have much extra cash in those days so most of our improvements were cosmetic and superficial. We worked with what we had. A few coats of paint, a faux granite counter and an embellishment here or there were enough in the beginning. It became our favorite place to spend our time.
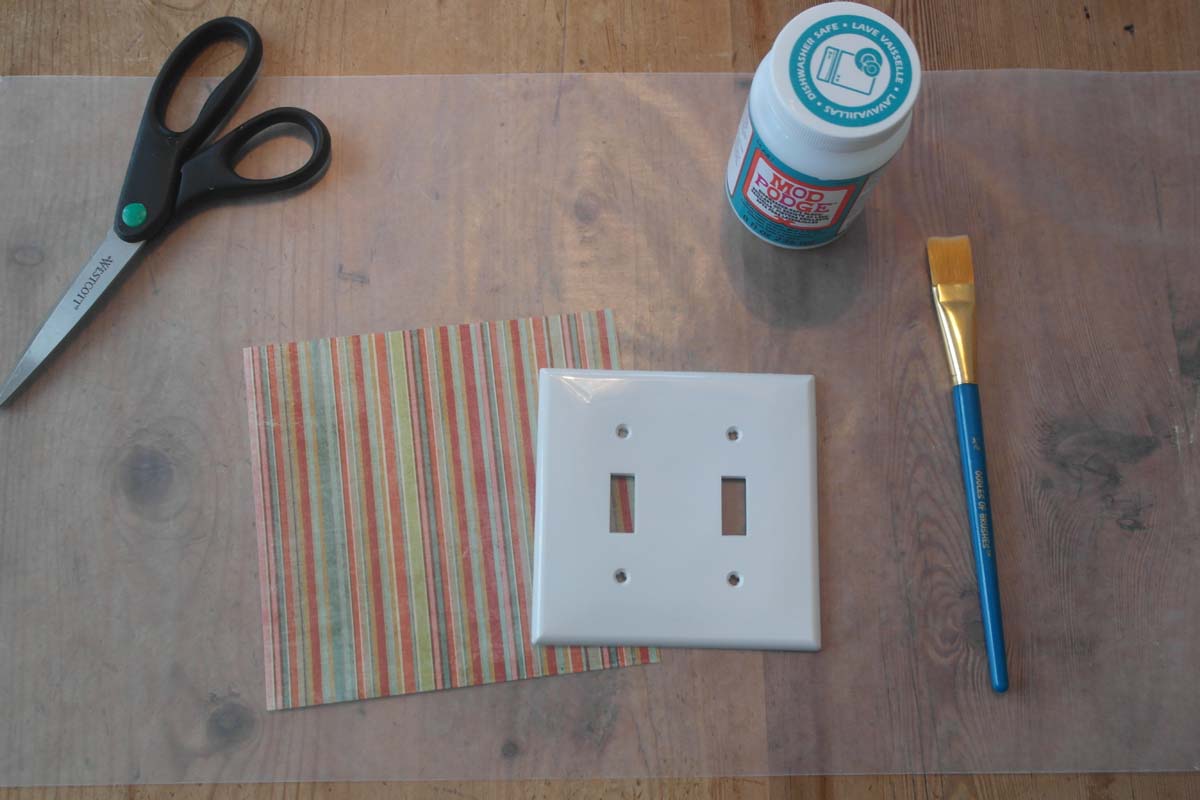
One easy upgrade we made back in those days was to the light switch covers. I had plenty of scrapbook paper and a seemingly endless supply of mod podge decoupage glue, so I went through a phase where I decoupaged almost every light switch cover in sight with coordinating patterned paper. It was fun and easy and really brightened things up.
When we renovated the space years later turning it into our forever home the light switches disappeared and we were back to inexpensive white plastic ones bought in bulk. We had so many other projects happening at that time that it really didn’t bother me.
But, the time was right to revisit this super easy project. It wasn’t something I planned to do for every room but a few visible light switch covers would do the trick. We had recently remodeled our downstairs bathroom so I decided to start there using a striped paper that coordinated well with the wall color. You thought I would have shied away from stripes after my experience making my French Cushion but fortunately this one had no pattern matching.
That light switch cover came out great so I started working my way around the light switch covers on the first floor of my house.
Instructions
This is a really low stress project. If you mess up, you can start again for $1.29. I’ve used scrapbook paper for this project, but fabric, tissue paper and other textiles work well too.
The slide show below provides step by step instructions on covering a light switch cover with decorative paper using decoupage medium.
I covered six light switch covers and was happy with how they all came out. I might have to move onto the second floor next.


This is a fairly easy project that really transforms something so basic into something beautiful. My familly commented on how much they liked them. They really stand out.
Have you ever done a small project that had a big impact?
I’m participating in a Blogging A-Z Challenge for April 2021. I will be posting new content every day this month except most Sundays. Each post is associated with a letter of the alphabet, starting with A and ending with Z. My theme for the challenge is Craft Projects for my Home. To read more of my A to Z posts from this year, click HERE.


cool idea! I’ve seen brass light switch covers, etc. but I’ve never seen paper covered covers.
LikeLiked by 1 person
It’s a super easy one and really does have a big impact.
LikeLike
I painted my daughter’s when she was young with little flowers. Later she did one with zebra stripes. We used the fabric paint with the tips in little bottles. If it stays on fabric being washed, it stays on light switch covers!
It is probably fine, but for me, I’d stay away from using paper nestled up to electric wires!
LikeLike
Those sound like some fun light switch covers too! I’ve painted covers before but only solid covers never with a fun design.
If you don’t like the paper near the wires, you could just cover the front. That would work too! I never really thought of it but makes sense.
LikeLike
I had no idea light switch covers are even a thing! Making them sure seems to be a less “involved” project than the others you have been telling us about in this year’s challenge.
Also I have never heard that “camp” is a term that’s used for an individual building. I associate with camp an event like summer or ski camp or a kind of dorm, like a building that hosts large rooms where several people sleep. So interesting. Chalet is what we know in the Swiss Alps. It is mostly made of wood.
https://thethreegerbers.blogspot.com/2021/04/a-z-2021-life-is-what-you-make-of-it.html
LikeLiked by 1 person
I do think camp is a local thing. When we think of chalets in Maine it’s usually related to the mountains and skiing. I’d love to visit one in the Swiss Alps!
LikeLike
What a brilliant idea. I’ve painted some of mine the same colour as the wall to disguise them, but I’d never thought of going to the opposite extreme and turn them into art!
LikeLiked by 1 person
I’ve painted some to match the wall too. It does work really well to mask them. This is definitely the opposite direction!
LikeLiked by 1 person
Those came out great.
LikeLike
Beautiful covers, I love the black one! I add washi tape to some of my light switch 😉
Quilting Patchwork & Appliqué
LikeLike
Washi tape would be a great way to decorate them too. I just used washi tape tonight. It’s so fun!
LikeLike
Very cool. I’ve seen a lot of decorated light switches but usually they are painted. I love this idea!
LikeLiked by 1 person
It does seem to be a popular thing to do.
LikeLiked by 1 person
I have quite a few decorative light switch covers throughout my home; some are decoupaged like you show here, others are painted, a few more are fired ceramic. I’ve not tried to make them myself — Ibuy them at art fairs whenever one strikes my fancy — but they are a simple, affordable (and pragmatic!) bit of artwork that make an otherwise go-hum object into a conversation piece. 🙂
LikeLiked by 1 person
It really does brighten up something so utilitarian. I’ve seen some cool ceramic ones.
LikeLike
A clever project to brighten any room. I especially like the striped one on the double switch cover.
https://gail-baugniet.blogspot.com
LikeLike
That’s one of my favorites too!
LikeLike
Well, I can see what I will be doing in May when I take my post a-to-z blogging break! It will take me the whole month to work through the many wonderful crafts you have presented — like this one. Novelty switch plates can cost a fortune. You’ve come up with a wonderful and cost effective workaround! https://mollyscanopy.com/2021/04/line-dancing-and-long-distance-friendships-atozchallenge/
LikeLiked by 1 person
Cost effective is always a good thing! Plus, when you make them yourself you can pick the color and design. It’s a win-win!
LikeLiked by 1 person
I love the look of unique light switch plates and have replaced almost all of the generic ones in my house. Love the ones you’ve done!
LikeLiked by 1 person
It’s so easy to swap them out. I bet you’ve found some fun ones.
LikeLiked by 1 person
This sure brought back memories. Years ago I did a lot of wallpapering and always made sure to cover the plates around the switches and electrical outlets with the paper, matching it up so closely in the design that they blended into the wall. It was a lot of work, but I sure liked the look of it.
LikeLiked by 1 person
I bet it was a great look. It’s not easy to matching those patterns.
LikeLike
This is such a cool idea and looks straight forward enough for me to have a go. Between your posts and Frederique’s, I’ll turn into a crafter by the time June rolls in:) I think!
Thank you for sharing this idea today.
LikeLiked by 1 person
I’m loving Frederique’s posts too – such great ideas. I’m going to have to try some more projects once the A to Z is done.
LikeLike